


The need to maintain database integrity cannot be overemphasized. One of the ways to ensure this is by performing ACID transactions; this simply means that actions that are meant to be completed as a 'whole' are either all completed or not completed at all.
Key takeaways
By the end of this tutorial, the reader will be able to understand:
- What database transactions are
- When to use database transactions
- How to use MongoDB's database transaction
Dependencies
- Node.js (version >= 14.0)
- MongoDB Atlas account
- Code editor e.g. VSCode
- Terminal or CMD
- Postman
The concept called 'database transaction'
A database transaction is a unit of work performed within a database management system against a database that you want to treat as "a whole." A transaction generally represents any change in a database. Transactions in a database environment have two main purposes:
- To keep a database consistent even in cases of system failure. When execution stop (either partially or completely, many operations upon a database remain uncompleted or unclear status.
- To provide isolation between programs accessing a database concurrently.
In a database management system, a transaction is a single unit of logic or work, sometimes made up of multiple operations. Any logical calculation done in a consistent model in a database is known as a transaction. One example is a transfer from one bank account to another: the complete transaction requires subtracting the amount to be transferred from one account and adding that same amount to the other.
A database transaction has the following properties, referred to 'ACID':
- Atomic: All the commands that make up the transaction are treated as a single unit or not treated at all.
- Consistent: It must conform to existing constraints in the database.
- Isolated: It must not affect other transactions.
- Durable: It must get written to persistent storage.
A classical example is transferring money from one bank account to another. Money is debited from the source account and then credited to the destination account. The operation has to be fully completed else there will be a loss to either or both parties.
Database transaction in MongoDB
MongoDB added support for multi-document ACID transactions in version 4.0 in 2018 and extended that support for distributed multi-document ACID transactions in version 4.2 in 2019.
MongoDB's document model allows related data to be stored together in a single document. However, there are cases where true multi-document, multi-collection MongoDB transactions are the best choice.
MongoDB transactions work similarly to transactions in other databases. To use a transaction, start a MongoDB session through a driver. Then, use that session to execute your group of database operations. You can run any of the CRUD (create, read, update, and delete) operations across multiple documents, multiple collections, and multiple shards.
We'll be creating a simple application that performs typical banking transactions. Let's get into it!
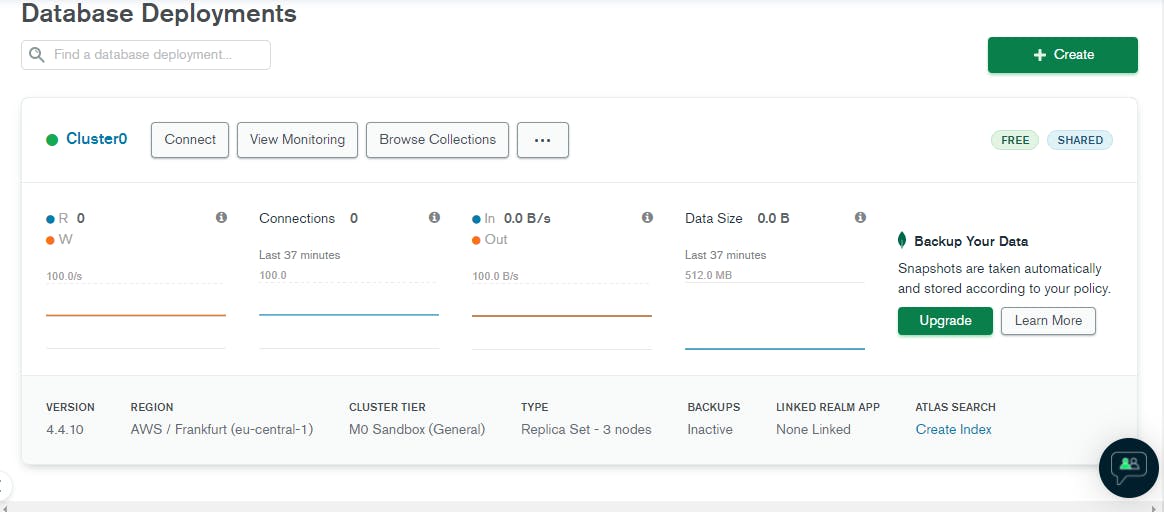
Create your Mongo Atlas Account
Skip this if you're familiar with the subject.
- Sign up on MongoDB Atlas.
- Create a new project or use any existing project of your choice.
- Create a database/cluster. Follow the prompt.
You should see something similar to this.
Click on Cluster -> Connect your application.
Copy the connection string and save it somewhere. It should look like this: mongodb+srv://<username>:<password>@cluster0.abcde.mongodb.net/myFirstDatabase?retryWrites=true&w=majority
Update <username> and <password> with the credentials you created.
Set up the starter code
Let's start by creating a new folder in any directory of your choice.
mkdir demo-wallet
cd demo-wallet
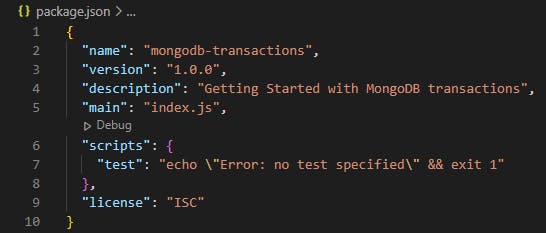
Let's set up our node app.
Run the command npm init and follow the prompt. You should have something like this in your package.json file.
Install the following packages
npm install dotenv express mongoose uuid

npm install nodemon --save-dev
Update the start script in package.json with this code.
//package.json

  "scripts": {
    "dev": "nodemon index",
    "start": "node index",
    "test": "echo \"Error: no test specified\" && exit 1"
  },
Create a new file called .env and update accordingly. Credentials which are confidential are included here.
//.env

DATABASE_URL = mongodb+srv://<username>:<password>@cluster0.abcde.mongodb.net/myFirstDatabase?retryWrites=true&w=majority
PORT = 4000
Create an entry point index.js. The application will run starting from this point.
// index.js
const express = require('express');
const dotenv = require('dotenv');
const mongoose = require('mongoose');
dotenv.config();

const app = express();
app.use(express.json());

mongoose
  .connect(process.env.DATABASE_URL, {
    useNewUrlParser: true,
    useUnifiedTopology: true
  })
  .then(() => {
    console.log('Successfully connected to MongoDB!');
  })
  .catch((err) => {
    console.log('Unable to connect to MongoDB');
  });

const PORT = process.env.PORT || 4000;

app.listen(PORT, () => {
  console.log(`Server listening on port ${PORT}`);
});
Start the server with the command npm run dev or nodemon index.

Create the models
Our application will only have 2 collections: Wallets and Transactions. Wallets store the accounts of all users while Transactions store all transactions performed by the users.
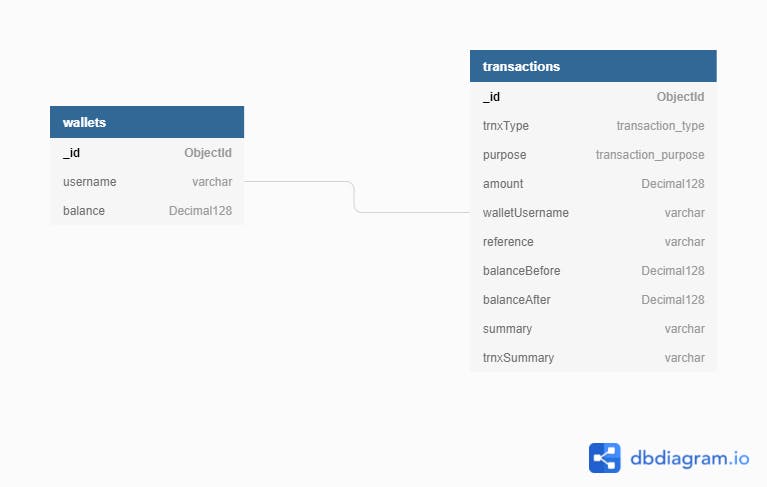
There is a 1-to-Many relationship between Wallets and Transactions. This means that a wallet can perform multiple transactions and multiple transactions can be tied to a single wallet account. The username will serve as the immutable field identifying a wallet.
Create a new folder called models and create 2 files; wallets.js & transactions.js.
// wallets.js
const mongoose =require('mongoose');

const walletSchema = new mongoose.Schema(
  {
    username: {
        type: String,
        required: true,
        trim: true,
        immutable: true,
        unique: true
    },
    balance: {
        type: mongoose.Decimal128,
        required: true,
        default: 0.00
    },

  },
  { timestamps: true }
);

const Wallets = mongoose.model('Wallets', walletSchema);
module.exports = Wallets;


// transactions.js
const mongoose =require('mongoose');

const transactionSchema = new mongoose.Schema(
  {
    trnxType: {
      type: String,
      required: true,
      enum: ['CR', 'DR']
    },
    purpose:{
      type: String,
      enum : ['deposit', 'transfer', 'reversal', 'withdrawal'],
      required: true
    },
    amount: {
      type: mongoose.Decimal128,
      required: true,
      default: 0.00
    },
    walletUsername: {
      type: String,
      ref: 'Wallets'
    },
    reference: { type: String, required: true },
    balanceBefore: {
      type: mongoose.Decimal128,
      required: true,
    },
    balanceAfter: {
      type: mongoose.Decimal128,
      required: true,
    },
    summary: { type: String, required: true },
    trnxSummary:{ type: String, required: true }
  },
  { timestamps: true }
);

const Transactions = mongoose.model('Transactions', transactionSchema);
module.exports = Transactions;
Explaining the fields:
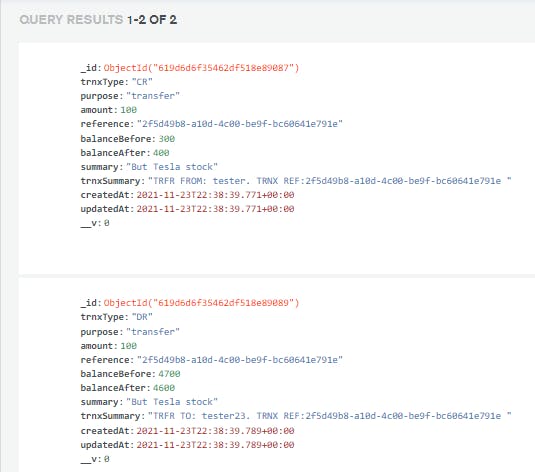
- trnxType -> This represents the type of transactions performed on a wallet; either a credit or a debit.
- purpose -> What is the essence of the transaction? 'deposit', 'transfer', 'reversal', 'withdrawal' or 'reversal'
- amount -> The transaction amount in decimal
- walletUsername -> This is a foreign key that mapps to the username in the Wallet collection. It identifies the user to whom the transaction relates.
- reference -> This represents an identifier to the database transactions; both debit and credit leg of the transaction.
- balanceBefore -> This represents the wallet balance before the transaction occurred.
- balanceAfter -> This represents the wallet balance after the transaction occurred.
- summary -> This represents the message from the sender on the details or purpose of the transaction.
- trnxSummary -> This represents a summary of the entire transaction. It can include the reference, purpose, sender username, etc as is deemed fit.
The business logic; Wallets
For any new user onboarded, a wallet is created with a balance of 0 and no transaction. Create 2 new folders called controllers and routes. Create a wallets.js file in each folder.
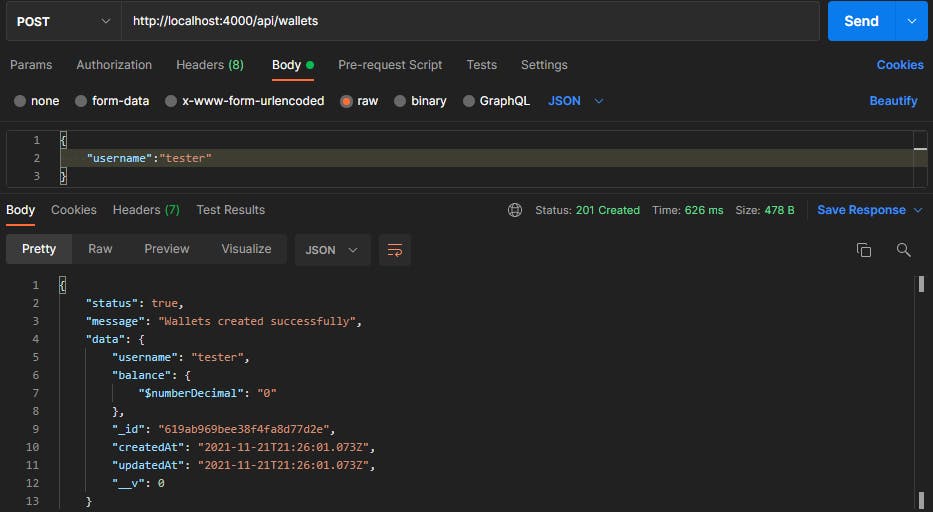
We'll create Create operation on the Wallets collections.
// controllers/wallets.js
const Wallets = require('../models/wallets');

const createWallet = async (req, res) => {
    try{
        const {username}= req.body;

        const walletExists = await Wallets.findOne({username});
        if (walletExists){
            return res.status(409).json({
                status: false,
                message: 'Wallet already exists',
            })
        }

        const result = await Wallets.create({username});
        console.log(result)
        return res.status(201).json({
            status: true,
            message: 'Wallets created successfully',
            data: result
        })
    } catch (err) {
        return res.status(500).json({
            status: true,
            message: `Unable to create wallet. Please try again. \n Error: ${err}`
        })
    }
}

module.exports = { createWallet };
Now we add the routes so we can test the URLs in Postman
// routes/wallets.js
const express = require('express');
const router = express.Router();

const Wallets = require('../controllers/wallets');

router.post('/', Wallets.createWallet);

module.exports = router;
Update index.js to include these routes
const walletRoutes = require( './routes/wallets');
app.use('/api/wallets', walletRoutes);
Let's test the application and create 2 wallets.
The business logic; Transactions
According to the accounting principle of double-entry, for every debit entry, there must be a corresponding credit entry.
Create a folder called utils and a file called transactions.js
The 2 methods are debitAccount which will debit the sender and creditAccount which will credit the received. We begin by searching if the user exists; the sender in debitAccount() and the receiver in creditAccount. The amount to be transferred must be greated than the wallet balance of the sender. Once all checks pass, the wallet balance will be updated and the transactions recorded.
/**
 * @param {decimal128} amount - in decimal
 * @param {String} username
 * @param {String} purpose
 * @param {String} reference
 * @param {String} summary
 * @param {String} trnxSummary
 * @returns {object} custom response
*/
// utils/transactions.js
const Wallets = require('../models/wallets');
const Transactions = require('../models/transactions');

const creditAccount = async ({amount, username, purpose, reference, summary, trnxSummary, session}) => {
  const wallet = await Wallets.findOne({username});
  if (!wallet) {
    return {
      status: false,
      statusCode:404,
      message: `User ${username} doesn\'t exist`
    }
  };

  const updatedWallet = await Wallets.findOneAndUpdate({username}, { $inc: { balance: amount } }, {session});

  const transaction = await Transactions.create([{
    trnxType: 'CR',
    purpose,
    amount,
    username,
    reference,
    balanceBefore: Number(wallet.balance),
    balanceAfter: Number(wallet.balance) + Number(amount),
    summary,
    trnxSummary
  }], {session});

  console.log(`Credit successful`)
  return {
    status: true,
    statusCode:201,
    message: 'Credit successful',
    data: {updatedWallet, transaction}
  }
}

const debitAccount = async ({amount, username, purpose, reference, summary, trnxSummary, session}) => {
  const wallet = await Wallets.findOne({username});
  if (!wallet) {
    return {
      status: false,
      statusCode:404,
      message: `User ${username} doesn\'t exist`
    }
  };

  if (Number(wallet.balance) < amount) {
    return {
      status: false,
      statusCode:400,
      message: `User ${username} has insufficient balance`
    }
  }

  const updatedWallet = await Wallets.findOneAndUpdate({username}, { $inc: { balance: -amount } }, {session});
  const transaction = await Transactions.create([{
    trnxType: 'DR',
    purpose,
    amount,
    username,
    reference,
    balanceBefore: Number(wallet.balance),
    balanceAfter: Number(wallet.balance) - Number(amount),
    summary,
    trnxSummary
  }], {session});

  console.log(`Debit successful`);
  return {
    status: true,
    statusCode:201,
    message: 'Debit successful',
    data: {updatedWallet, transaction}
  }
}

module.exports = {
    creditAccount, debitAccount
};
Create a new file in the controllers folder called transactions.js. The main business logic will be executed here.
If the debit is successful but the credit is not successful is not, the entire transaction will be rolled back; the sender is credited with the amount.
For any error that occurs, all successful operations will be rolled back.
// controllers/transactions.js
const Transactions = require('../models/transactions');
const mongoose = require('mongoose');
const { v4 } = require('uuid');
const { creditAccount, debitAccount } = require( '../utils/transactions');
const transfer = async (req, res) => {
const session = await mongoose.startSession();
session.startTransaction()
try {
const { toUsername, fromUsername, amount, summary} = req.body;
const reference = v4();
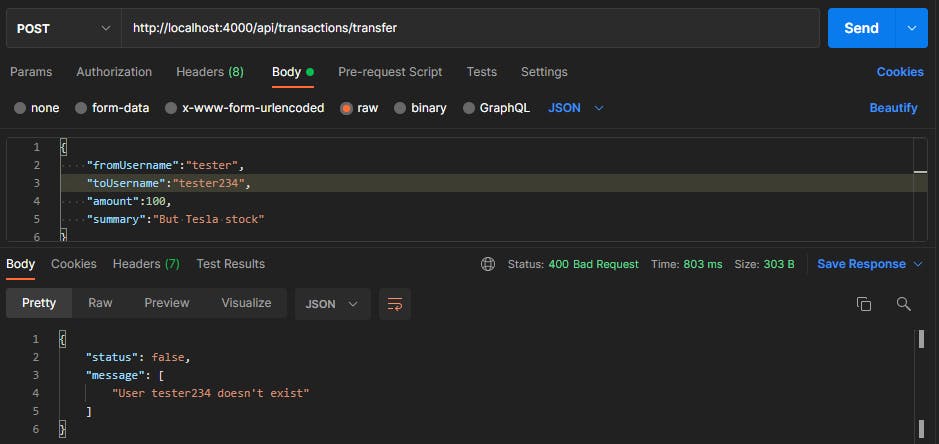
if (!toUsername && !fromUsername && !amount && !summary) {
return res.status(400).json({
status: false,
message: 'Please provide the following details: toUsername, fromUsername, amount, summary'
})
}
const transferResult = await Promise.all([
debitAccount(
{amount, username:fromUsername, purpose:"transfer", reference, summary,
trnxSummary: `TRFR TO: ${toUsername}. TRNX REF:${reference} `, session}),
creditAccount(
{amount, username:toUsername, purpose:"transfer", reference, summary,
trnxSummary:`TRFR FROM: ${fromUsername}. TRNX REF:${reference} `, session})
]);
const failedTxns = transferResult.filter((result) => result.status !== true);
if (failedTxns.length) {
const errors = failedTxns.map(a => a.message);
await session.abortTransaction();
return res.status(400).json({
status: false,
message: errors
})
}
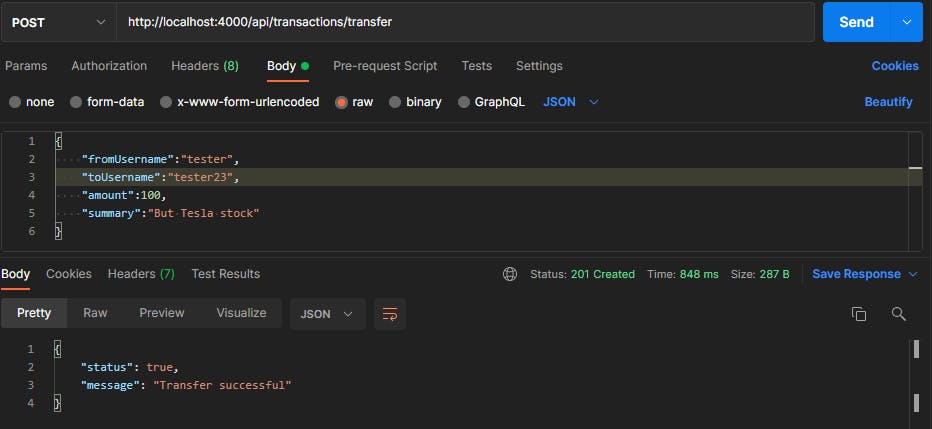
await session.commitTransaction();
session.endSession();
return res.status(201).json({
status: true,
message: 'Transfer successful'
})
} catch (err) {
await session.abortTransaction();
session.endSession();
return res.status(500).json({
status: false,
message: `Unable to find perform transfer. Please try again. \n Error: ${err}`
})
}
}
module.exports = { transfer };
A reference is required to identify this unit of transaction. We use uuid to create this unique identifier.
const session = await mongoose.startSession(); session.startTransaction() is used to initialize a database transaction.
const transferResult = await Promise.all([...]) takes debitAccount() and creditAccount() as input promises and returns a single Promise that resolves to an array of the results.
When either or both methods return with an error, the errors have to be displayed to the user and the transaction aborted. The transferResult is filtered based on the status returned from the helper methods. There is an error the status is false. The error(s) is(are) extracted and stored in errors and returned to the user. The session is aborted and all operations rolled back.
If there are no errors, we commit the transaction, end the session and return a success response to the user.
In the catch block, the transaction is aborted and the session ended. Network failure is a reason the catch block will be executed. All transactions performed will be rolled back.
Let's create the routes and update the index.js file with it
// routes/transactions.js
const express = require('express');
const router = express.Router();

const Transactions = require('../controllers/transactions');

router.post('/transfer', Transactions.transfer);

module.exports = router;


// index.js
const transactionRoutes = require( './routes/transactions');
app.use('/api/transactions', transactionRoutes);
Test the application
Right now, all transactions will fail because the wallet balances are 0. Head over to MongoDB and manually update the balance of a wallet. This wallet will act as the sender.

Back to Postman. Let's test with a sender who exists and a recipient who doesn't exist. We expect to debit the sender and then try to credit the receiver but since the receiver doesn't exist, the debit on the sender is reversed. The balances of the 2 users should be as before the transaction is performed and the Transactions collection should be empty.
Check the console, you will see the Debit successful message. The debit leg was successful but the credit leg was not. The debit was reversed and the operation was aborted.
Let's try again with users who exist.
Now that you've learnt the basics, go ahead and try other transactions like reversals, withdrawals, deposits or other use cases.
NoSQL databases that support ACID transactions
MongoDB is not the only NoSQL database that supports ACID transactions. RavenDB, FaunaDB and FoundationDB are ACID compliant.
References
- What are ACID Transactions?
- ACID Transactions in NoSQL? RavenDB vs MongoDB
- How to Use MongoDB Transactions in Node.js
