


Storing media directly in your database can be considered poor practise as it leads to the poor performance of a system, amongst other issues. To substitute for this, Cloudinary was developed.
Cloudinary is an end-to-end image- and video management solution for websites and mobile apps, covering everything from image and video uploads, storage, manipulations, optimizations to delivery.
In this article, we'll be uploading images to Cloudinary in a node.js/express.js application.
Pre-requisite
- Cloudinary account
- Node.js installed on your computer
- Postman installed on your computer
Cloudinary configuration
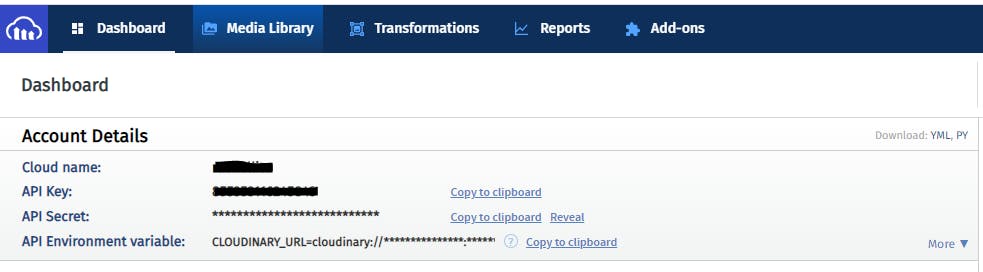
Login to your Cloudinary account. On your dashboard are 3 configurations- Cloud name, Api key and Api Secret. Copy these (into a .txt file or sticky notes) as you will need them shortly.
Install the dependencies and start coding
1) Create a folder to work with. Run npm init -y. This will accept the default config.
2) Install the following dependencies- cloudinary, express, dotenv and express-fileupload
npm install cloudinary express dotenv express-fileupload
3) Create an index.js file which is our starting point, cloudinary.js file to contain the Cloudinary config and upload function, and .env file to contain the environment configs.
4) Copy the Cloudinary configs from your .txt file or sticky note and insert them in the .env file as seen below.
CLOUDINARY_NAME= insert_your_name
CLOUDINARY_API_KEY = insert_your_api_key
CLOUDINARY_API_SECRET = insert_your_api_secret
5) Connect your app to Cloudinary.
// cloudinary.js
const dotenv = require('dotenv');
const cloudinary = require('cloudinary').v2;

dotenv.config();

cloudinary.config({
  cloud_name: process.env.CLOUDINARY_NAME,
  api_key: process.env.CLOUDINARY_API_KEY,
  api_secret: process.env.CLOUDINARY_API_SECRET
});

const upload = async (file) => {
  const image = await cloudinary.uploader.upload(
    file,
    (result) => result
  );
  return image;
};

module.exports = { upload };
In lines 6-8, we connected our app to cloudinary.
The upload function that handles uploading the images to cloudinary. It's good practice to have a single function that you can reuse.
You can also upload the images into a specific folder;
const image = await cloudinary.uploader.upload(
    file,
    { folder: 'Test' },
    (result) => result
  );
6) Let's make use of our upload function
// app.js
const express = require('express');
const fileUpload = require("express-fileupload");
const { upload } = require('./cloudinary')
const app = express();
app.use(
fileUpload({
useTempFiles: true
})
);
app.listen(3000, () => {
console.log('Server listening on port 3000')
})
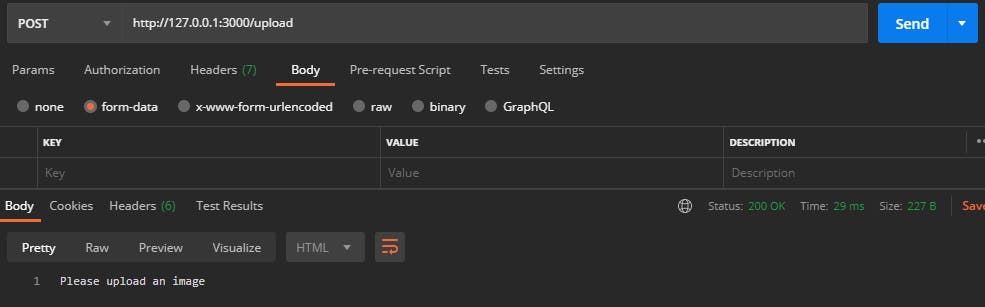
app.post('/upload', async (req, res)=>{
if (!req.files) return res.send('Please upload an image');
const {image} = req.files;
const cloudFile = await upload(image.tempFilePath);
console.log(cloudFile)
res.status(201).json({
message:'Image uploaded successfully',
imageUrl:cloudFile.url
})
})
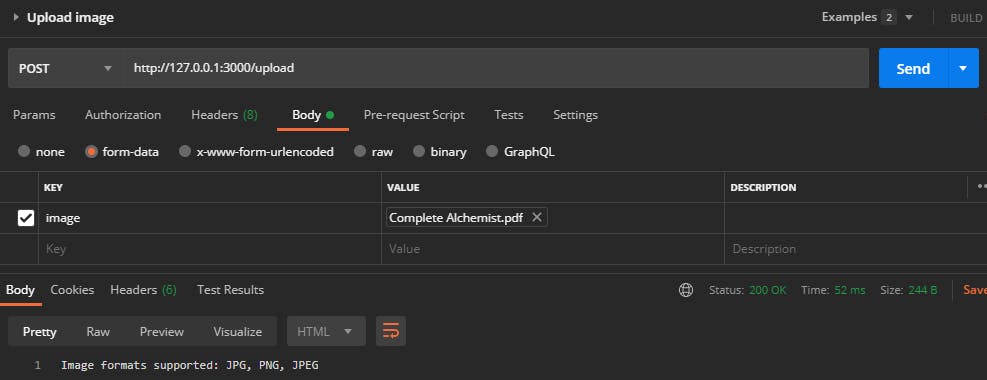
You can specify the file type that you want to support.
const fileTypes = ['image/jpeg', 'image/png', 'image/jpg'];
if (!fileTypes.includes(image.mimetype)) return res.send('Image formats supported: JPG, PNG, JPEG');
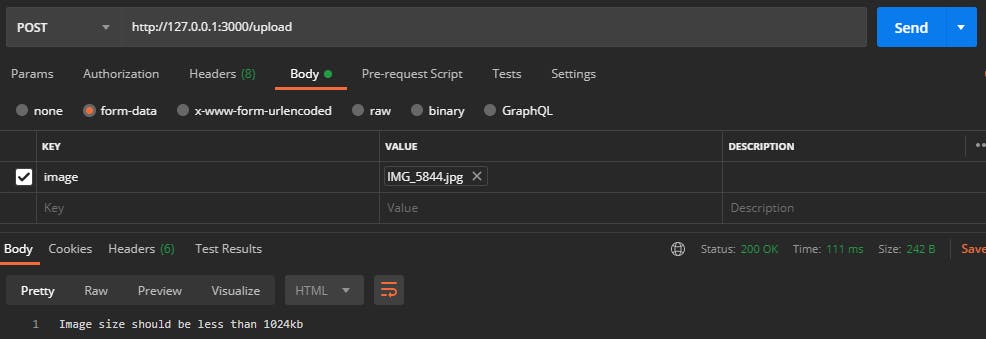
You can also limit the size of the image to be uploaded.
const imageSize = 1024;
if (image.size / 1024 > imageSize) return res.send(`Image size should be less than ${imageSize}kb`);
By default, the image size is in bytes. To convert to kb, divide the image by 1024.
Let's add the 2 options above into our route
app.post('/upload', async (req, res)=>{
if (!req.files) return res.send('Please upload an image')

    const {image} = req.files;
    const fileTypes = ['image/jpeg', 'image/png', 'image/jpg'];
    const imageSize = 1024;

    if (!fileTypes.includes(image.mimetype)) return res.send('Image formats supported: JPG, PNG, JPEG');

    if (image.size / 1024 > imageSize) return res.send(`Image size should be less than ${imageSize}kb`);

    const cloudFile = await upload(image.tempFilePath);
    console.log(cloudFile)

    return res.status(201).json({
        message:'Image uploaded successfully',
        imageUrl:cloudFile.url
    })
})
Let's test
Run your app, typing node index.js in the terminal.
Launch Postman and make a POST request with the url- http://127.0.0.1:3000/upload.
We will test with 4 scenarios, trying to upload
1) Without an image
2) A file larger than 1024kb (1MB)
3) A file not of type png, jpg nor jpeg
4) An image less than or equal to 1024kb
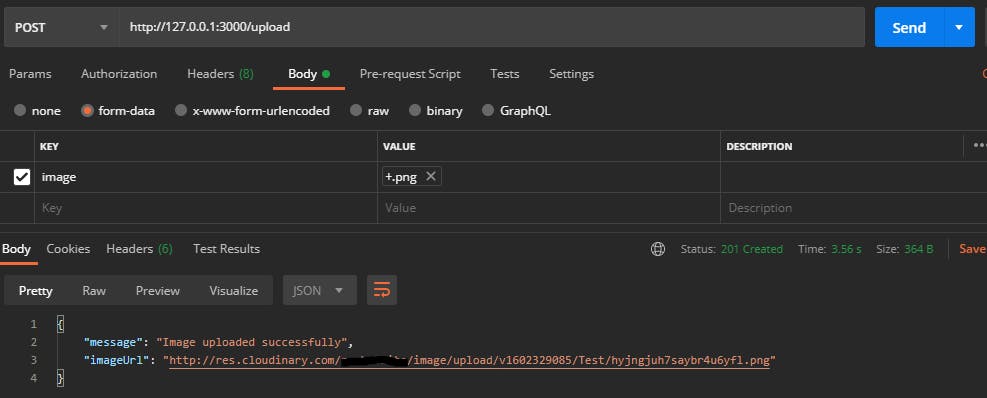
If you notice, a new folder called tmp has been created in the root directory. This folder temporarily stores files uploaded. Cloudinary picks up the image via its file path before hosting on its server.
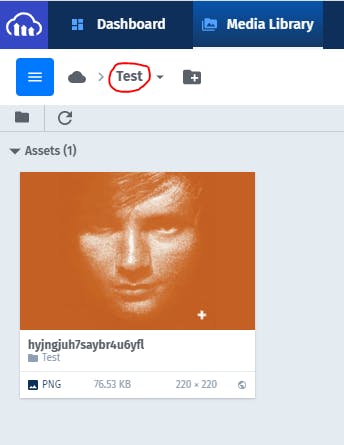
Now, let's head over to Cloudinary and see our image.
Conclusion
Cloudinary is a powerful tool that does much more than what we have covered in this article. I challenge you to go further and explore what more the tool has to offer.
Resources
If you like this article, feel free to comment and share. You can also reach out to me on Twitter | LinkedIn | Github
Ciao👋🏼